
Using Zoom’s Annotate function to promote active learning
During this pandemic, Zoom is being widely used for online teaching. As an instructor who teaches Chinese as a second language (L2), I have found Zoom’s Annotate function very useful in terms of promoting active learning and providing instructors with timely feedback on students’ learning outcomes. In this article, I will share some examples of how to use the Annotate function for designing engaging L2 learning activities.
Where to find the Annotation tool in Zoom
As a meeting host, after you have shared your screen with other participants, you can find the “Annotate” button in the toolbar on the top of your screen.

After pressing the button, a second toolbar will appear:

Here you can choose different ways (the commonly used ones are Select, Type text, and Draw) to annotate on the shared screen; all participants in the meeting can see the annotations you make.
Students can find the button “View Options” at the top of their screen, right next to the notice “You are viewing someone’s screen”. In the drop-down menu, after selecting “Annotate”, the annotation toolbar will appear:
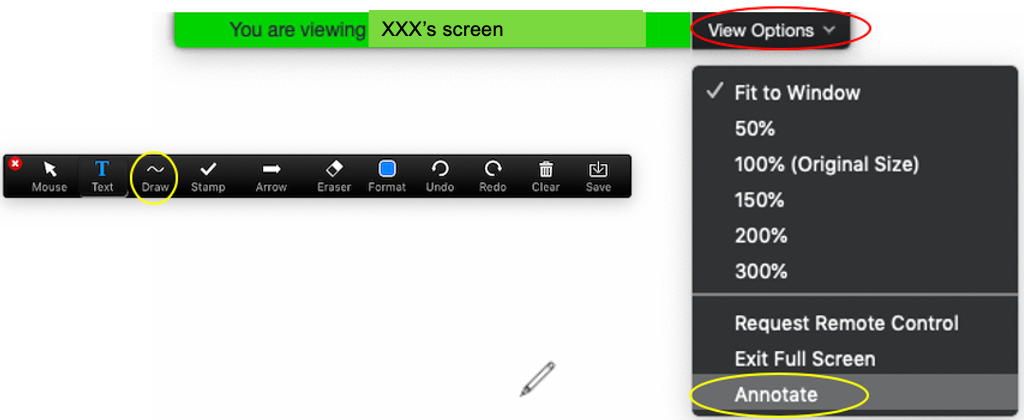
Now the students can annotate on the instructor’s shared screen.
Examples of using the Annotation tool in online language instruction
Next, I would like to share some instructional activities that I use in my online Chinese classes. To complete these activities, students need to use the Annotate function to mark on my shared PowerPoint slides.
Vocabulary learning and reviewing
The instructor can ask students to match pronunciations and meanings of newly learned words, or to match the words with their corresponding pictures, or to type the words next to the pictures. For visual learners, pictures are always very helpful. Through this kind of activity, the instructor can check how well students have learned the words, identify which words took them more time to recall, and offer additional explanation or practice opportunities.

(student annotations shown in blue)

(student annotations shown in red)

(student annotations shown in red)
Listening Exercises
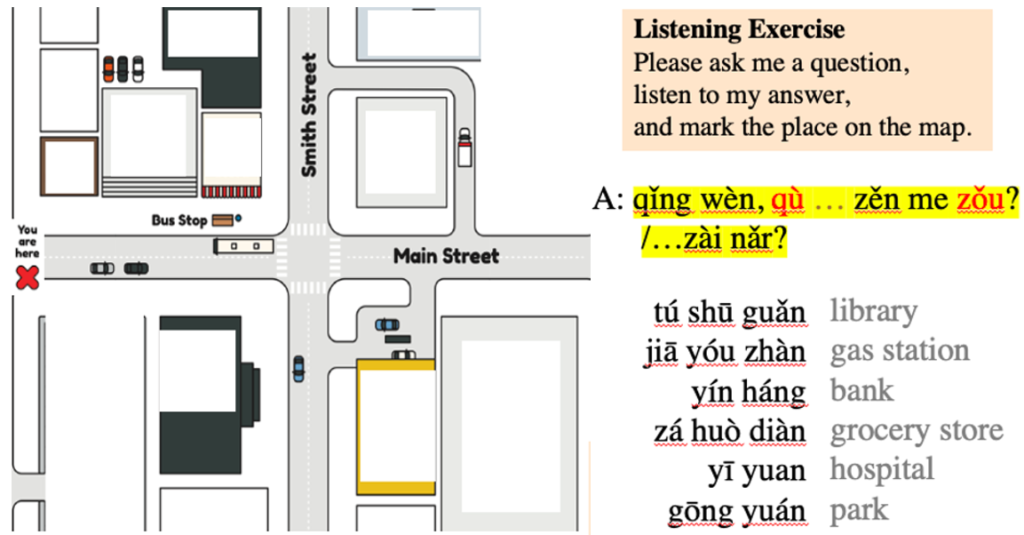
In this example, after students learn how to give directions in Chinese, I show them the map, tell them where we are on the map (the “You are here” sign on the middle left of the image), and ask each student to ask me a question of how to go to a place (e.g., tú shū guǎn, the library). To respond, I may say go straight, then turn left at the first intersection. Then students need to mark the location of the library on the map based on the directions I just gave. This can effectively check whether students understood my responses. To make this activity more challenging, the instructor can speak faster and faster when answering different questions.
Grammar learning and reviewing
In this example, a new sentence pattern is introduced to students, which consists of four main components: tool, object, verb, and complement. I give students more examples of this kind of sentence and ask them to mark the components in each sentence. This activity can assist students in better understanding the structure and meaning of the sentence pattern.

In this example, students read the dialogue and choose appropriate phrases of potential complements to fill in the blanks by typing the letters. This kind of activity can help students to apply the communicative function of the target language forms in real-life contexts.

Scaffolding integrated conversational tasks
Before asking students to complete an integrated conversational task in order to apply newly learned vocabulary and grammar, the instructor can first ask them to recall and type the sentence patterns based on the prompts. In this way, the instructor can check how well students have mastered the target language forms and determine whether they are ready for the task.

Reading exercises
The last example is a reading exercise. When students read a passage, the instructor can ask them to mark words and phrases that they do not understand. I have found this very helpful especially for those students who are struggling with vocabulary and reading. Sometimes in face-to-face classes, these students may feel embarrassed to ask about the words they don’t remember or the sentences they don’t understand. However, in the online environment, the teacher does not know who is leaving annotations, which kind of creates a more welcoming and low-anxiety learning environment for these students.

The instructor can also ask those students who have already finished reading to type the meaning of those underlined words and phrases. In this way, students can help and learn from each other. For answering the comprehension check questions, students can either type or mark the answers in the text. When giving explanations, the instructor can also use the annotate function, for example to circle the keywords or to underline the important sentences to catch students’ attention.
Tips for using the Annotation tool
When using the Annotation tool, please pay attention to the following:
- If students have not used Annotate before, remember to tell them where to find it (you can show them the screenshot at the top of this page).
- Please give clear directions, like whether you ask students to underline, to type, or to draw lines. Consider giving a demonstration first.
- Sometimes the screen can become messy with students’ annotations. There are several ways to address this problem: (1) leave enough space on your slides for students to annotate; (2) divide the class into groups and ask one student from each group to annotate; (3) display students’ names and ask them to annotate in assigned places.
- Please remember to clear all drawings before moving to the next slide, otherwise the annotations will always remain on the screen. To do this, press the “Clear” button in the annotate toolbar as shown below:

To summarize, using the Annotation tool can promote active learning and provide both instructors and students with timely and effective feedback. I have also found students enjoy annotating on my slides: they feel more engaged and they love the opportunity to share the blackboard with the instructor. As a famous saying goes: “Tell me, and I’ll forget; show me, and I may remember; but involve me, and I’ll understand.” Integrating this kind of activity can largely enhance students’ participation, which will facilitate their learning and understanding.
Author: Runqing Qi, Chinese Teaching Assistant and Second Language Acquisition Ph.D. Candidate, The University of Iowa